Tutorial: Setting up your rates

Tutorial: Configure event rates
After having created your event, the next step in setting up your online ticketing system is that of different rates. To help you define these, This article will give you some tips on how to find the right prices.
Thanks to our tool designed for its intuitiveness and ease of handling, this task will only take you a few minutes!
Let our tutorial guide you to learn quickly configure the various rates for your event.
1 - Go to your back office
Log in to your Wilout ONLINE account using your credentials to access your back office.
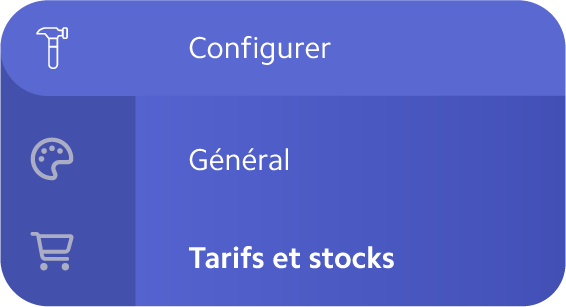
Hover your cursor over the sidebar on the far left, then on the 4th icon”Set up” and click on”Prices and stocks”.
2 - Set up a rate
- Click on the” buttonAdd a rate”
- Name it and add a description of it in the field provided.
For example:”Reduced rate - Student, under 12 years old on the presence of proof”
- Define the ticket price and the quantity available in stock.
- Add options and modes and set them up.
- Save and try again as many times as needed.

3 - Options and modes
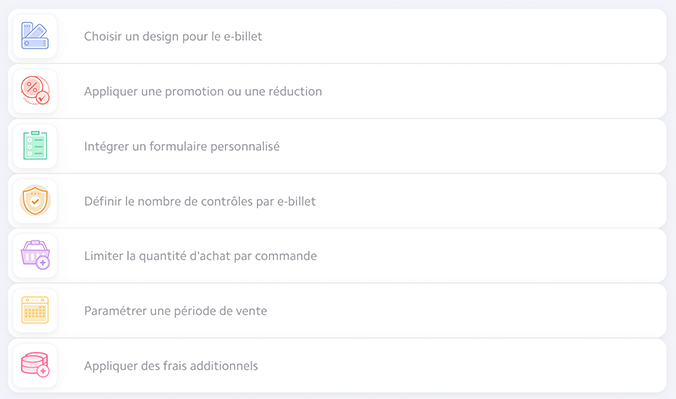
We have developed a panel of options and modes (personalization, promotion, number of checks, etc.) that you can add to your tickets, in order to personalize and configure them one by one, according to the needs of your event.
To add them to your tickets, click on them and then configure them before saving.
Here are our different modes and options:
The groups
In order to best organize your different rates, you can create groups to organize them.
These groups can be useful for sorting prices by date, price type, or quantity sold, for example.
- To create a group, click on the” buttonCreate a group”.
- By default, your first group will be named “Group 1,” but you can rename it by clicking on that name and then replacing it with the name of your choice.
- To add a rate, click and drag and drop the desired rate into the group.
- You can reorder the groups by clicking and dragging groups above or below each other.

As you will have understood, configuring the rates well is a step indispensable in the preparation of your event.
Our complete solution allows you to create, sort and manage each of your ticket types, making ticketing management more fluid than ever for you and your team.
On your marks. Ready? Sell!

.JPG)
.png)